> ## Documentation Index
> Fetch the complete documentation index at: https://docs.ampersand.ai/llms.txt
> Use this file to discover all available pages before exploring further.
# Zendesk Support
## What's Supported
### Supported Actions
The Zendesk Support connector supports:
* [Read Actions](/read-actions), including full historic backfill and incremental reads for several objects.
* [Write Actions](/write-actions).
* [Proxy Actions](/proxy-actions), using the base URL `https://{{.workspace}}.zendesk.com`.
### Supported Objects
The Zendesk Support connector supports incremental read for the following objects:
* [Attributes](https://developer.zendesk.com/api-reference/ticketing/ticket-management/skill_based_routing/#list-account-attributes)
* [Instance Values](https://developer.zendesk.com/api-reference/ticketing/ticket-management/skill_based_routing/#list-agent-attribute-values)
* [Organizations](https://developer.zendesk.com/api-reference/ticketing/organizations/organizations/#json-format)
* [Ticket Events](https://developer.zendesk.com/api-reference/ticketing/ticket-management/incremental_exports/#incremental-ticket-event-export)
* [Ticket Metrics](https://developer.zendesk.com/api-reference/ticketing/tickets/ticket_metrics/#json-format)
* [Tickets](https://developer.zendesk.com/api-reference/ticketing/tickets/tickets/#json-format)
* [Users](https://developer.zendesk.com/api-reference/ticketing/users/users/#json-format)
The Zendesk Support connector supports reading from and writing to the following 48 objects:
* [Ticket Forms](https://developer.zendesk.com/api-reference/ticketing/tickets/ticket_forms/#json-format)
* [Ticket Fields](https://developer.zendesk.com/api-reference/ticketing/tickets/ticket_fields/#json-format)
* [Ticket Audits](https://developer.zendesk.com/api-reference/ticketing/tickets/ticket_audits/#json-format)
* [Suspended Tickets](https://developer.zendesk.com/api-reference/ticketing/tickets/suspended_tickets/#json-format)
All others in alphabetical order:
* [Activities](https://developer.zendesk.com/api-reference/ticketing/tickets/activity_stream/#json-format)
* [Audit Logs](https://developer.zendesk.com/api-reference/ticketing/account-configuration/audit_logs/#json-format)
* [Automations](https://developer.zendesk.com/api-reference/ticketing/business-rules/automations/#json-format)
* [Bookmarks](https://developer.zendesk.com/api-reference/ticketing/ticket-management/bookmarks/#json-format)
* [Brands](https://developer.zendesk.com/api-reference/ticketing/account-configuration/brands/#json-format)
* [Custom Roles](https://developer.zendesk.com/api-reference/ticketing/account-configuration/custom_roles/#json-format)
* [Custom Statuses](https://developer.zendesk.com/api-reference/ticketing/tickets/custom_ticket_statuses/#json-format)
* [Deletion Schedules](https://developer.zendesk.com/api-reference/ticketing/business-rules/deletion_schedules/#json-format)
* [Group Memberships](https://developer.zendesk.com/api-reference/ticketing/groups/group_memberships/#json-format)
* [Groups](https://developer.zendesk.com/api-reference/ticketing/groups/groups/#json-format)
* [Job Statuses](https://developer.zendesk.com/api-reference/ticketing/ticket-management/job_statuses/#json-format)
* [Locales](https://developer.zendesk.com/api-reference/ticketing/account-configuration/locales/#json-format)
* [Macros](https://developer.zendesk.com/api-reference/ticketing/business-rules/macros/#json-format)
* [Organization Fields](https://developer.zendesk.com/api-reference/ticketing/organizations/organization_fields/#json-format)
* [Organization Memberships](https://developer.zendesk.com/api-reference/ticketing/organizations/organization_memberships/#json-format)
* [Organization Subscriptions](https://developer.zendesk.com/api-reference/ticketing/organizations/organization_subscriptions/#json-format)
* [Recipient Addresses](https://developer.zendesk.com/api-reference/ticketing/account-configuration/support_addresses/#json-format)
* [Requests](https://developer.zendesk.com/api-reference/ticketing/tickets/ticket-requests/#json-format)
* [Resource Collections](https://developer.zendesk.com/api-reference/ticketing/ticket-management/resource_collections/#json-format)
* [Satisfaction Ratings](https://developer.zendesk.com/api-reference/ticketing/ticket-management/satisfaction_ratings/)
* [Sessions](https://developer.zendesk.com/api-reference/ticketing/account-configuration/sessions/#json-format)
* [Sharing Agreements](https://developer.zendesk.com/api-reference/ticketing/tickets/sharing_agreements/#json-format)
* [Tags](https://developer.zendesk.com/api-reference/ticketing/ticket-management/tags/#json-format)
* [Target Failures](https://developer.zendesk.com/api-reference/ticketing/targets/target_failures/#json-format)
* [Targets](https://developer.zendesk.com/api-reference/ticketing/targets/targets/#json-format)
* [Trigger Categories](https://developer.zendesk.com/api-reference/ticketing/business-rules/trigger_categories/#json-format)
* [Triggers](https://developer.zendesk.com/api-reference/ticketing/business-rules/triggers/#json-format)
* [User Fields](https://developer.zendesk.com/api-reference/ticketing/users/user_fields/#json-format)
* [Views](https://developer.zendesk.com/api-reference/ticketing/business-rules/views/#json-format)
* [Workspaces](https://developer.zendesk.com/api-reference/ticketing/ticket-management/workspaces/#json-format)
### Example Integration
For an example manifest file of a Zendesk Support integration, visit our [samples repo on Github](https://github.com/amp-labs/samples/blob/main/zendeskSupport/amp.yaml).
## Before You Get Started
To integrate Zendesk with Ampersand, you need to [Create a Zendesk Account](#create-a-zendesk-account) and obtain the following credentials from your Zendesk App:
* Client ID/Unique identifier
* Client Secret
You will then use these credentials to connect your application to Ampersand.
### Create a Zendesk Account
You need a **Zendesk** account to connect with Ampersand.
* Follow instructions for [Getting a trial account or sponsored account for development](https://developer.zendesk.com/documentation/api-basics/getting-started/getting-a-trial-or-sponsored-account-for-development/)
* Ensure that your subdomain starts with the `d3v-` prefix. This is crucial for ensuring that you can [request a global OAuth client](https://developer.zendesk.com/documentation/marketplace/building-a-marketplace-app/set-up-a-global-oauth-client/#requesting-a-global-oauth-client) later, which will allow you to connect to your customer's Zendesk instances.
### Creating a Zendesk App
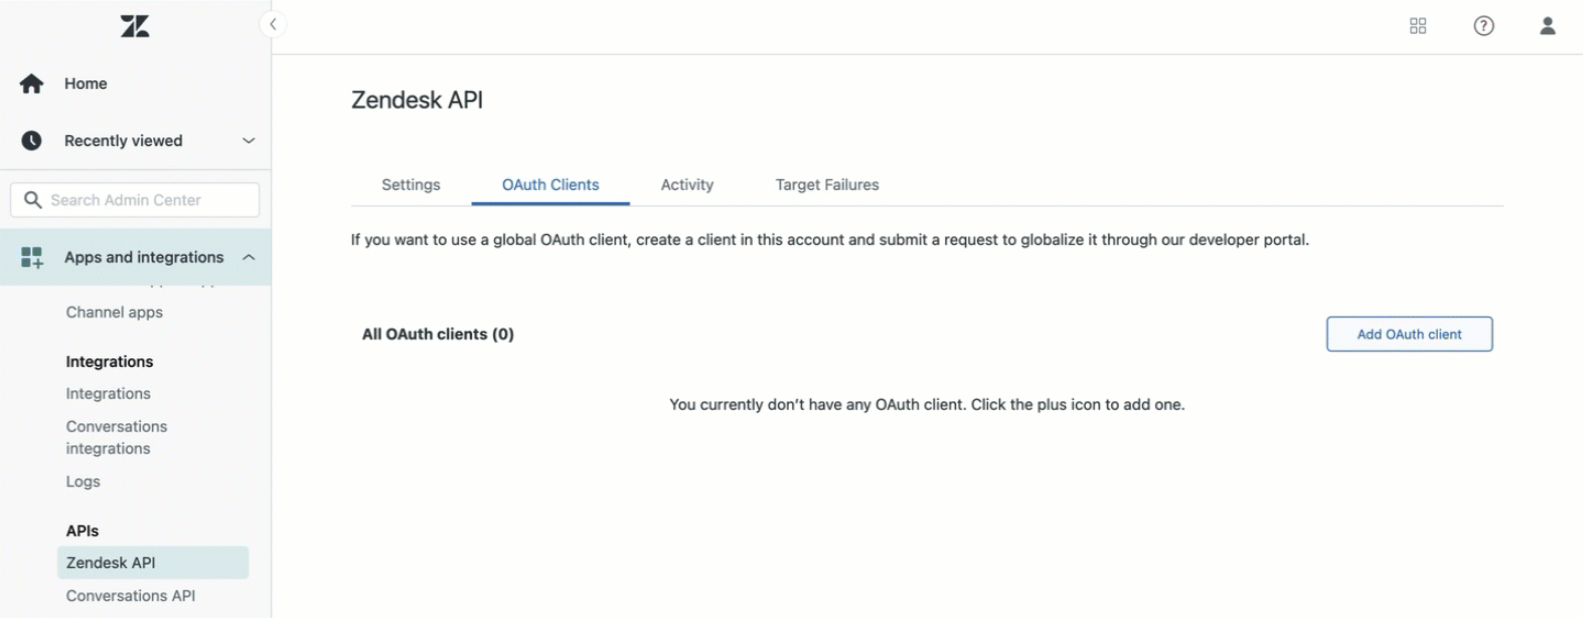
1. Log in to Your [Zendesk Account](https://www.zendesk.com/login/).
2. Go to **Admin Center**.
3. On the *Admin Center* page, click **Apps and integrations**.
4. Under the **APIs** heading in the left navbar, click on "Zendesk API".
5. Click on **OAuth Clients** tab.
6. On the *OAuth Clients* page, click **Add OAuth client**.
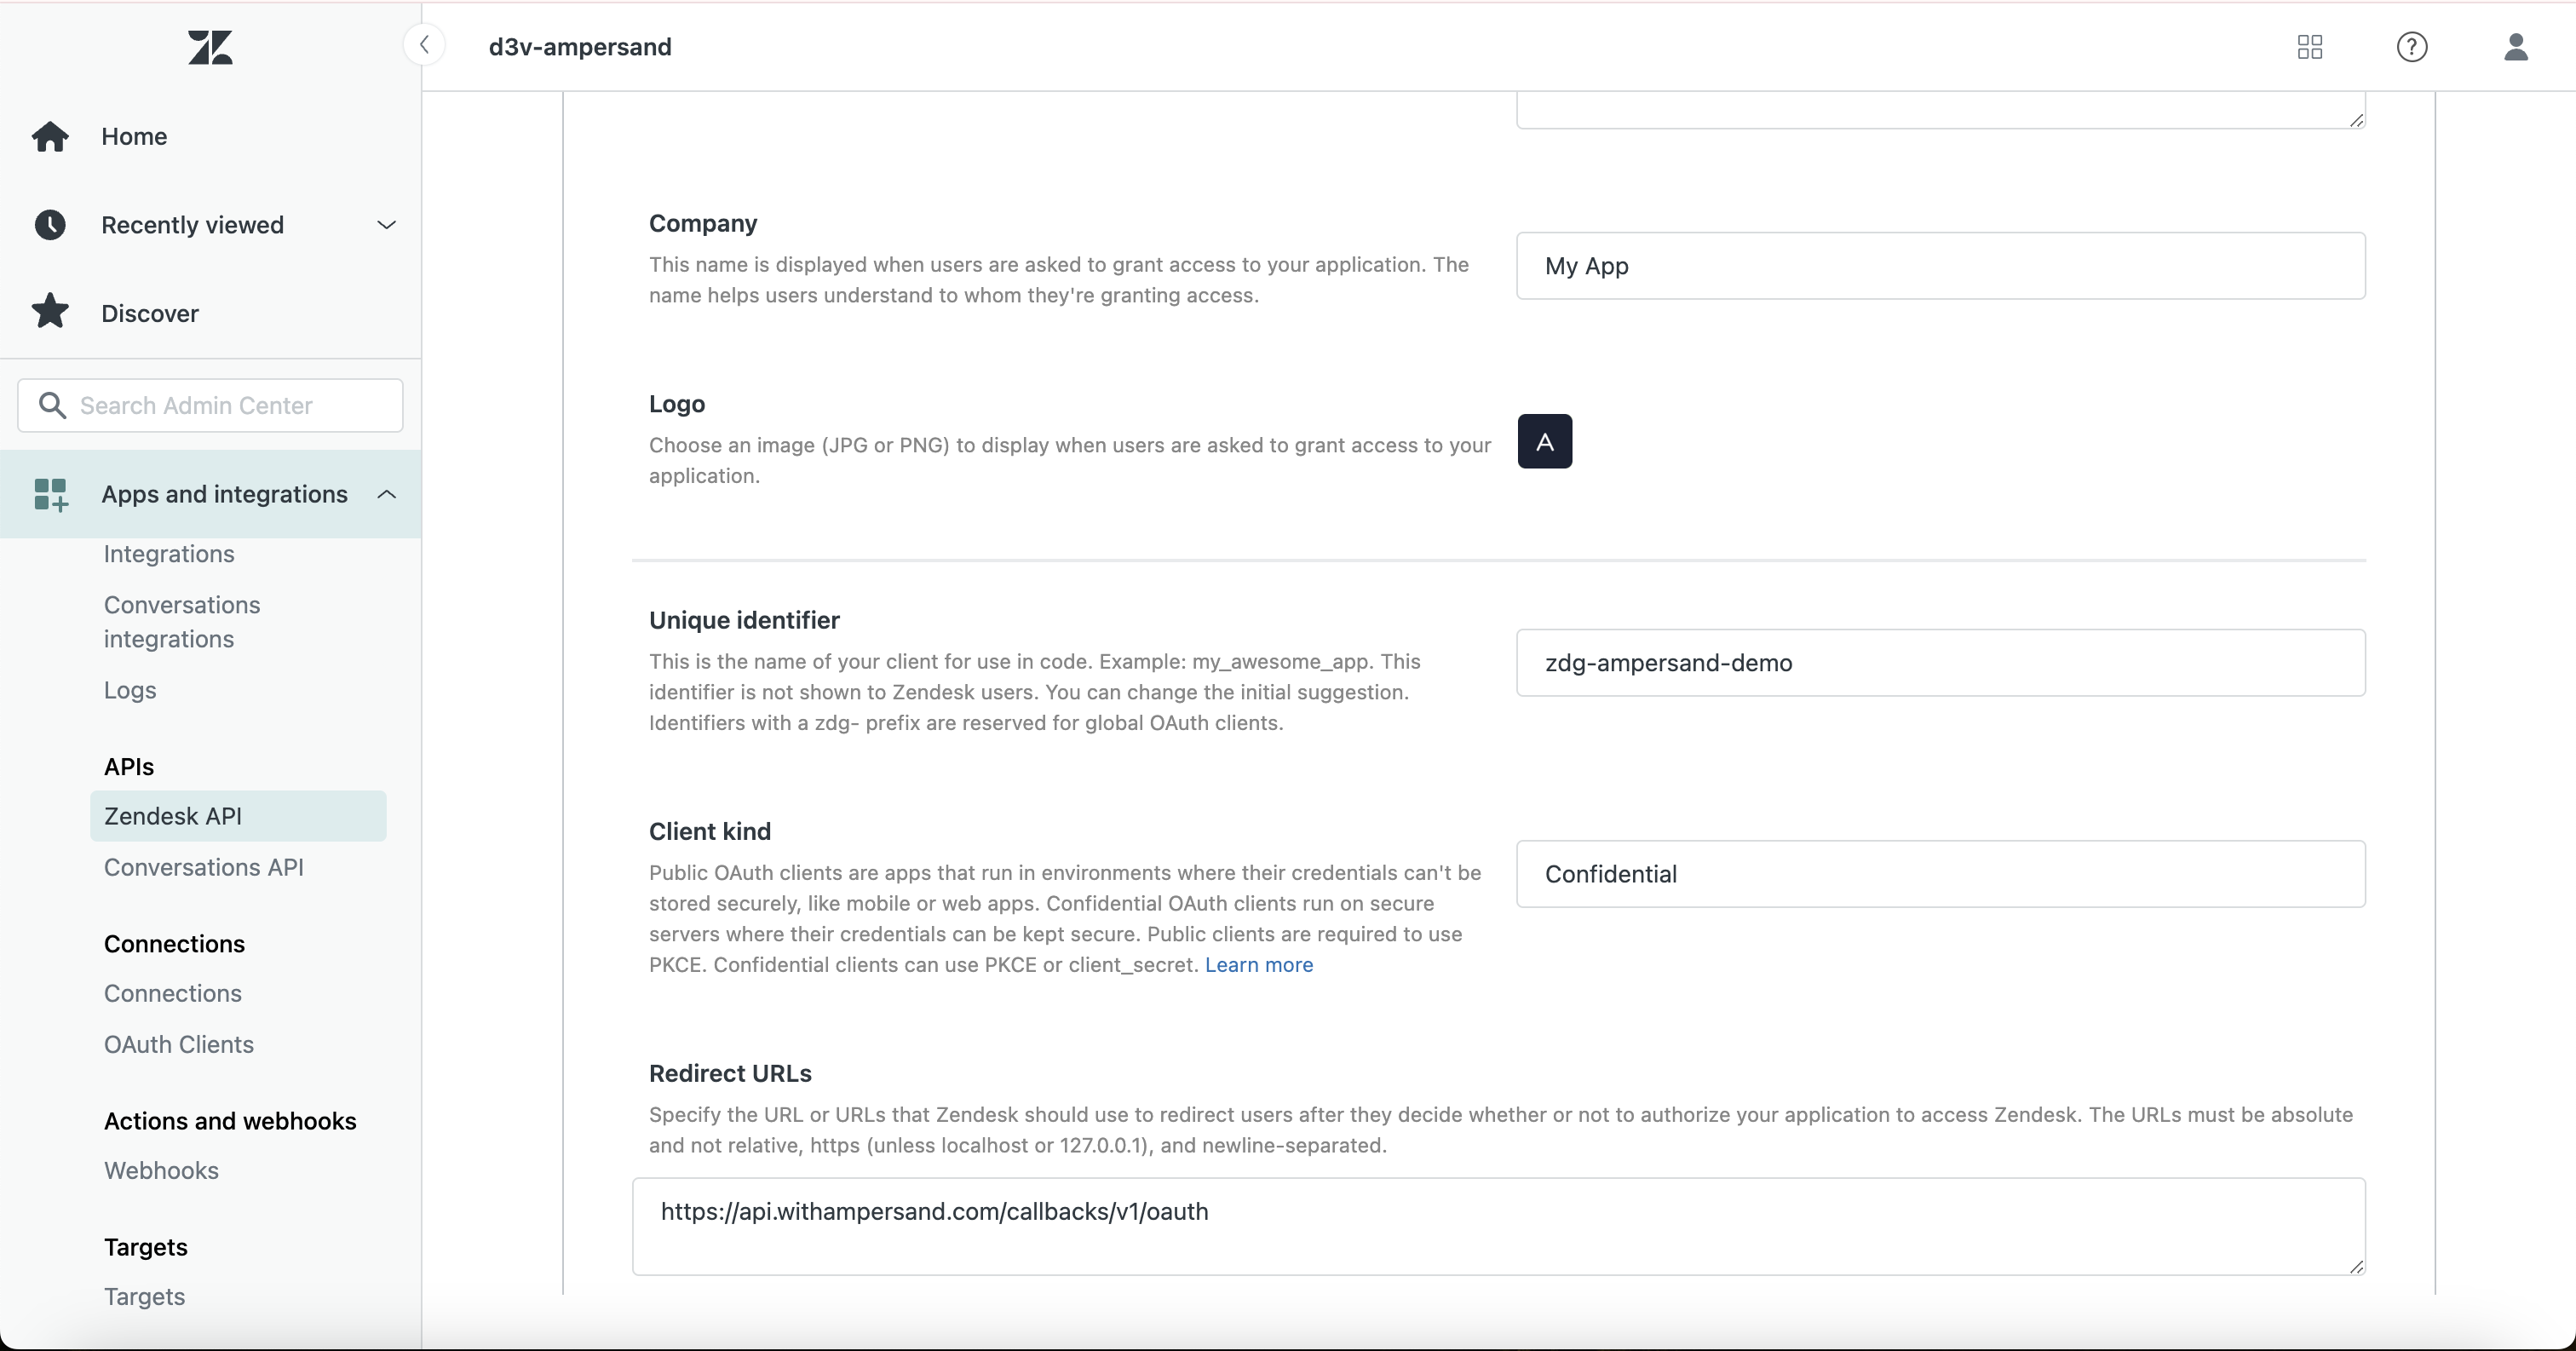
 7. On the *Add OAuth client* form, enter the following details:
1. **Client name**: The name of the OAuth client that will be shown to your users in the OAuth popup.
2. **Unique identifier**: Ensure that you enter a name that is prefixed with `zdg-`, this allows you to [request a global OAuth client](https://developer.zendesk.com/documentation/marketplace/building-a-marketplace-app/set-up-a-global-oauth-client/#requesting-a-global-oauth-client) later. This identifier is also what you will enter in the Provider Apps tab of the Ampersand dashboard in the next step.
3. **Client kind**: Select "Confidential"
4. **Redirect URLs**: Enter the Ampersand redirect URL: `https://api.withampersand.com/callbacks/v1/oauth`
8. Click **Save**.
7. On the *Add OAuth client* form, enter the following details:
1. **Client name**: The name of the OAuth client that will be shown to your users in the OAuth popup.
2. **Unique identifier**: Ensure that you enter a name that is prefixed with `zdg-`, this allows you to [request a global OAuth client](https://developer.zendesk.com/documentation/marketplace/building-a-marketplace-app/set-up-a-global-oauth-client/#requesting-a-global-oauth-client) later. This identifier is also what you will enter in the Provider Apps tab of the Ampersand dashboard in the next step.
3. **Client kind**: Select "Confidential"
4. **Redirect URLs**: Enter the Ampersand redirect URL: `https://api.withampersand.com/callbacks/v1/oauth`
8. Click **Save**.
 ## Add Zendesk App Details in Ampersand
1. Log in to your [Ampersand Dashboard](https://dashboard.withampersand.com).
2. Select the project where you want to add the Zendesk App.
## Add Zendesk App Details in Ampersand
1. Log in to your [Ampersand Dashboard](https://dashboard.withampersand.com).
2. Select the project where you want to add the Zendesk App.
 3. Navigate to the **Provider Apps** section.
4. Select **Zendesk** from the Provider list.
5. Enter the previously obtained **Unique identifier** in the **Client ID** field and the **Client Secret** in the **Client Secret** field. For a list of valid scopes, refer to the [Zendesk documentation](https://developer.zendesk.com/api-reference/ticketing/oauth/oauth_tokens/#scopes). Enter each scope in a separate line.
3. Navigate to the **Provider Apps** section.
4. Select **Zendesk** from the Provider list.
5. Enter the previously obtained **Unique identifier** in the **Client ID** field and the **Client Secret** in the **Client Secret** field. For a list of valid scopes, refer to the [Zendesk documentation](https://developer.zendesk.com/api-reference/ticketing/oauth/oauth_tokens/#scopes). Enter each scope in a separate line.
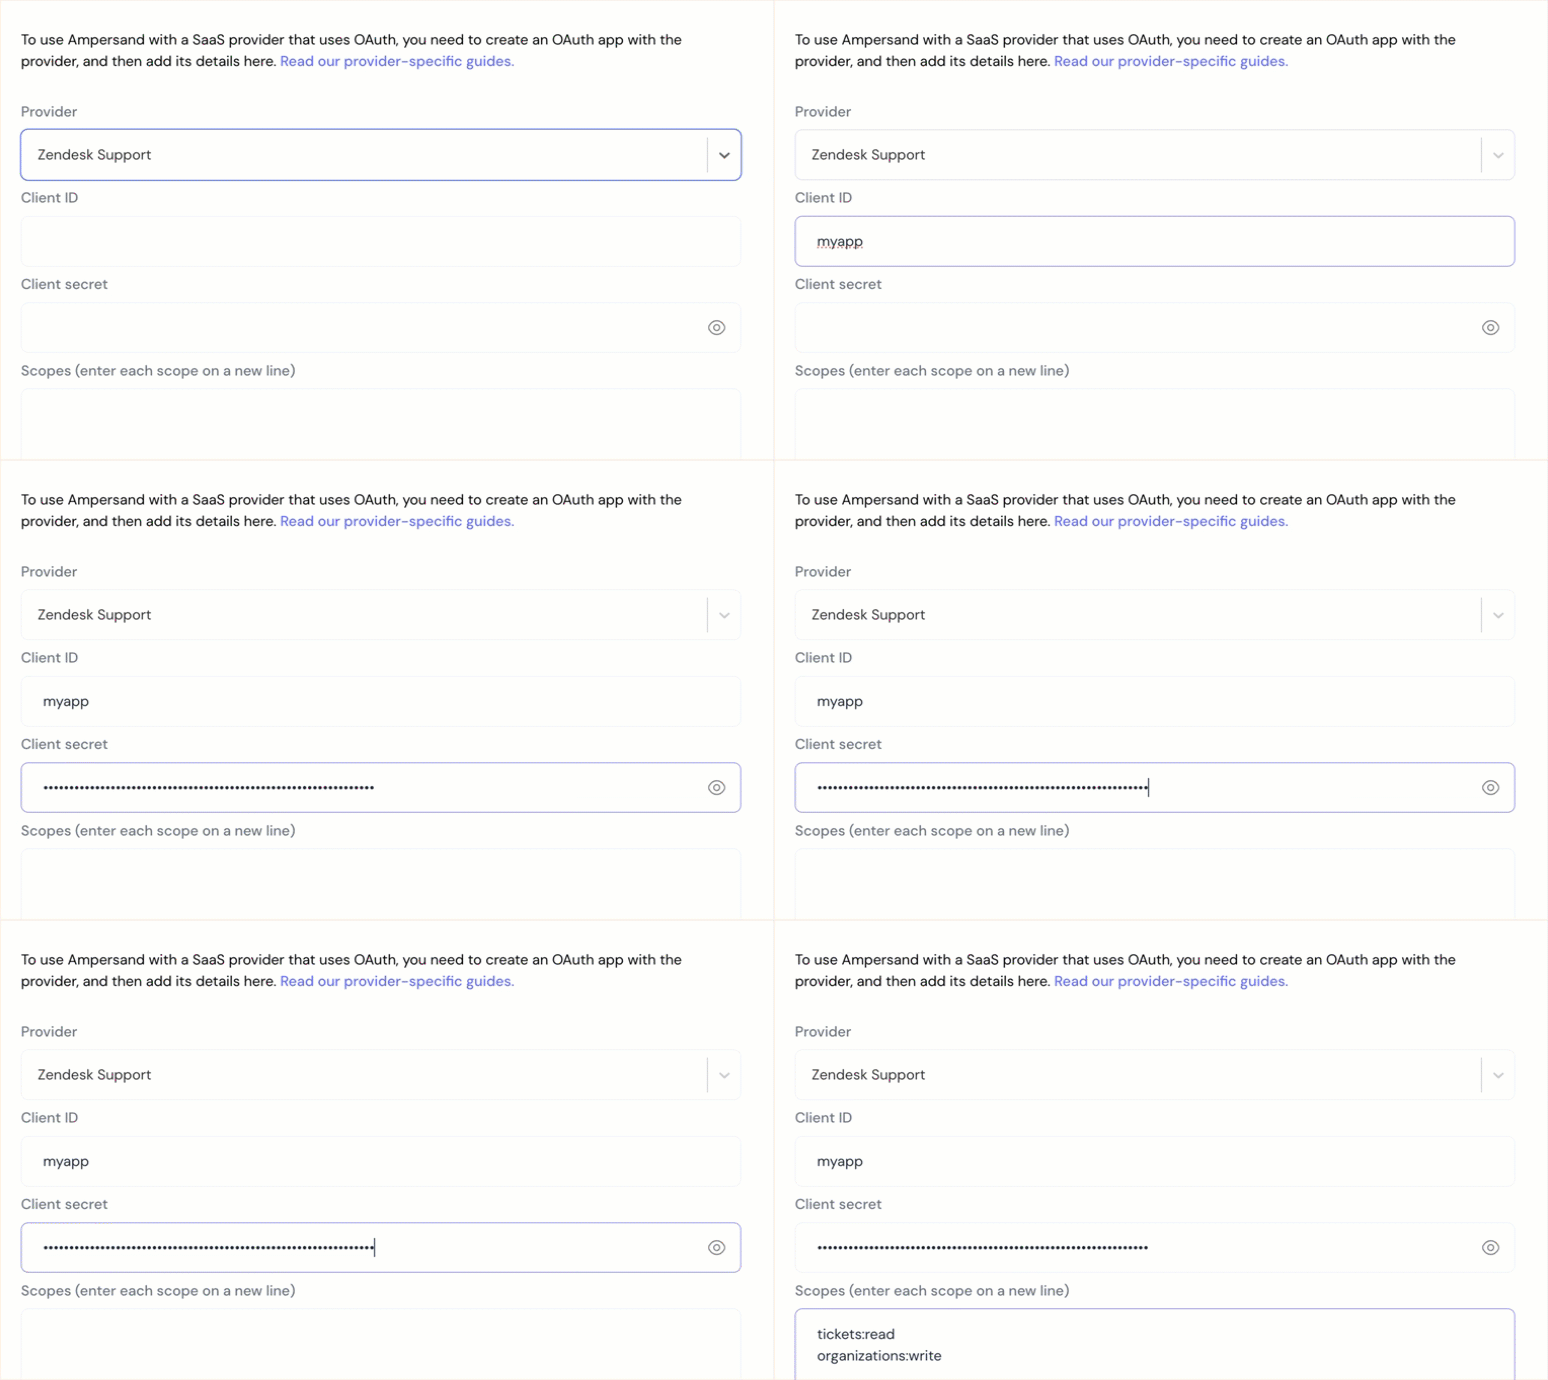 6. Click **Save Changes**.
## Using the connector
Please note that due to Zendesk's API permission requirements, this integration requires credentials from a Zendesk admin.
To start integrating with Zendesk Support:
* Create a manifest file like the [example](https://github.com/amp-labs/samples/blob/main/zendeskSupport/amp.yaml).
* Deploy it using the [amp CLI](/cli/overview).
* If you are using Read Actions, create a [destination](/destinations).
* Embed the [InstallIntegration](/embeddable-ui-components#install-integration) UI component.
* Start using the connector!
* If your integration has [Read Actions](/read-actions), you'll start getting webhook messages.
* If your integration has [Write Actions](/write-actions), you can start making API calls to our Write API.
* If your integration has [Proxy Actions](/proxy-actions), you can start making Proxy API calls.
## Launch your Zendesk app to production
In order to connect to your customer's Zendesk instances, you will need to [request a global OAuth client](https://developer.zendesk.com/documentation/marketplace/building-a-marketplace-app/set-up-a-global-oauth-client/#requesting-a-global-oauth-client). Please note that once you complete this process, you will need to reach out to the Zendesk team in order to edit your app (e.g. adding new scopes, modifying name).
This documentation is built and hosted on [Mintlify](https://mintlify.com), a developer documentation platform.
6. Click **Save Changes**.
## Using the connector
Please note that due to Zendesk's API permission requirements, this integration requires credentials from a Zendesk admin.
To start integrating with Zendesk Support:
* Create a manifest file like the [example](https://github.com/amp-labs/samples/blob/main/zendeskSupport/amp.yaml).
* Deploy it using the [amp CLI](/cli/overview).
* If you are using Read Actions, create a [destination](/destinations).
* Embed the [InstallIntegration](/embeddable-ui-components#install-integration) UI component.
* Start using the connector!
* If your integration has [Read Actions](/read-actions), you'll start getting webhook messages.
* If your integration has [Write Actions](/write-actions), you can start making API calls to our Write API.
* If your integration has [Proxy Actions](/proxy-actions), you can start making Proxy API calls.
## Launch your Zendesk app to production
In order to connect to your customer's Zendesk instances, you will need to [request a global OAuth client](https://developer.zendesk.com/documentation/marketplace/building-a-marketplace-app/set-up-a-global-oauth-client/#requesting-a-global-oauth-client). Please note that once you complete this process, you will need to reach out to the Zendesk team in order to edit your app (e.g. adding new scopes, modifying name).
This documentation is built and hosted on [Mintlify](https://mintlify.com), a developer documentation platform.