> ## Documentation Index
> Fetch the complete documentation index at: https://docs.ampersand.ai/llms.txt
> Use this file to discover all available pages before exploring further.
# Okta
## What's supported
### Supported actions
This connector supports:
* [Read Actions](/read-actions), including full historic backfill. Incremental reading is supported for the objects listed below. For all other objects, a full read of the Okta instance will be done per scheduled read.
* [Write Actions](/write-actions).
* [Proxy Actions](/proxy-actions), using the base URL `https://{{.workspace}}.okta.com`.
### Supported objects
The Okta connector supports reading from the following objects:
* [apps](https://developer.okta.com/docs/api/openapi/okta-management/management/tag/Application/) (supports incremental read)
* [authenticators](https://developer.okta.com/docs/api/openapi/okta-management/management/tag/Authenticator/) (supports incremental read)
* [authorizationServers](https://developer.okta.com/docs/api/openapi/okta-management/management/tag/AuthorizationServer/) (supports incremental read)
* [brands](https://developer.okta.com/docs/api/openapi/okta-management/management/tag/Brands/)
* [devices](https://developer.okta.com/docs/api/openapi/okta-management/management/tag/Device/) (supports incremental read)
* [domains](https://developer.okta.com/docs/api/openapi/okta-management/management/tag/CustomDomain/)
* [eventHooks](https://developer.okta.com/docs/api/openapi/okta-management/management/tag/EventHook/) (supports incremental read)
* [features](https://developer.okta.com/docs/api/openapi/okta-management/management/tag/Feature/)
* [groups](https://developer.okta.com/docs/api/openapi/okta-management/management/tag/Group/) (supports incremental read)
* [idps](https://developer.okta.com/docs/api/openapi/okta-management/management/tag/IdentityProvider/) (supports incremental read)
* [logs](https://developer.okta.com/docs/api/openapi/okta-management/management/tag/SystemLog/) (supports incremental read)
* [policies](https://developer.okta.com/docs/api/openapi/okta-management/management/tag/Policy/) (supports incremental read)
* [trustedOrigins](https://developer.okta.com/docs/api/openapi/okta-management/management/tag/TrustedOrigin/) (supports incremental read)
* [users](https://developer.okta.com/docs/api/openapi/okta-management/management/tag/User/) (supports incremental read)
* [zones](https://developer.okta.com/docs/api/openapi/okta-management/management/tag/NetworkZone/) (supports incremental read)
The Okta connector supports writing to the following objects:
* [groups](https://developer.okta.com/docs/api/openapi/okta-management/management/tag/Group/)
* [users](https://developer.okta.com/docs/api/openapi/okta-management/management/tag/User/)
### Example integration
For an example manifest file of an Okta integration, visit our [samples repo on GitHub](https://github.com/amp-labs/samples/blob/main/okta/amp.yaml).
## Before you get started
To connect Okta with Ampersand, you will need an [Okta account](https://developer.okta.com/signup/).
Once your account is created, you'll need to create an OAuth 2.0 app in Okta and obtain the following credentials:
* Client ID
* Client Secret
* Scopes
You will use these credentials to connect your application to Ampersand.
### Create an Okta account
Here's how you can sign up for an Okta developer account:
1. Go to the [Okta Developer Sign Up page](https://developer.okta.com/signup/) and create an account.
2. Complete the registration process and verify your email.
### Creating an Okta app
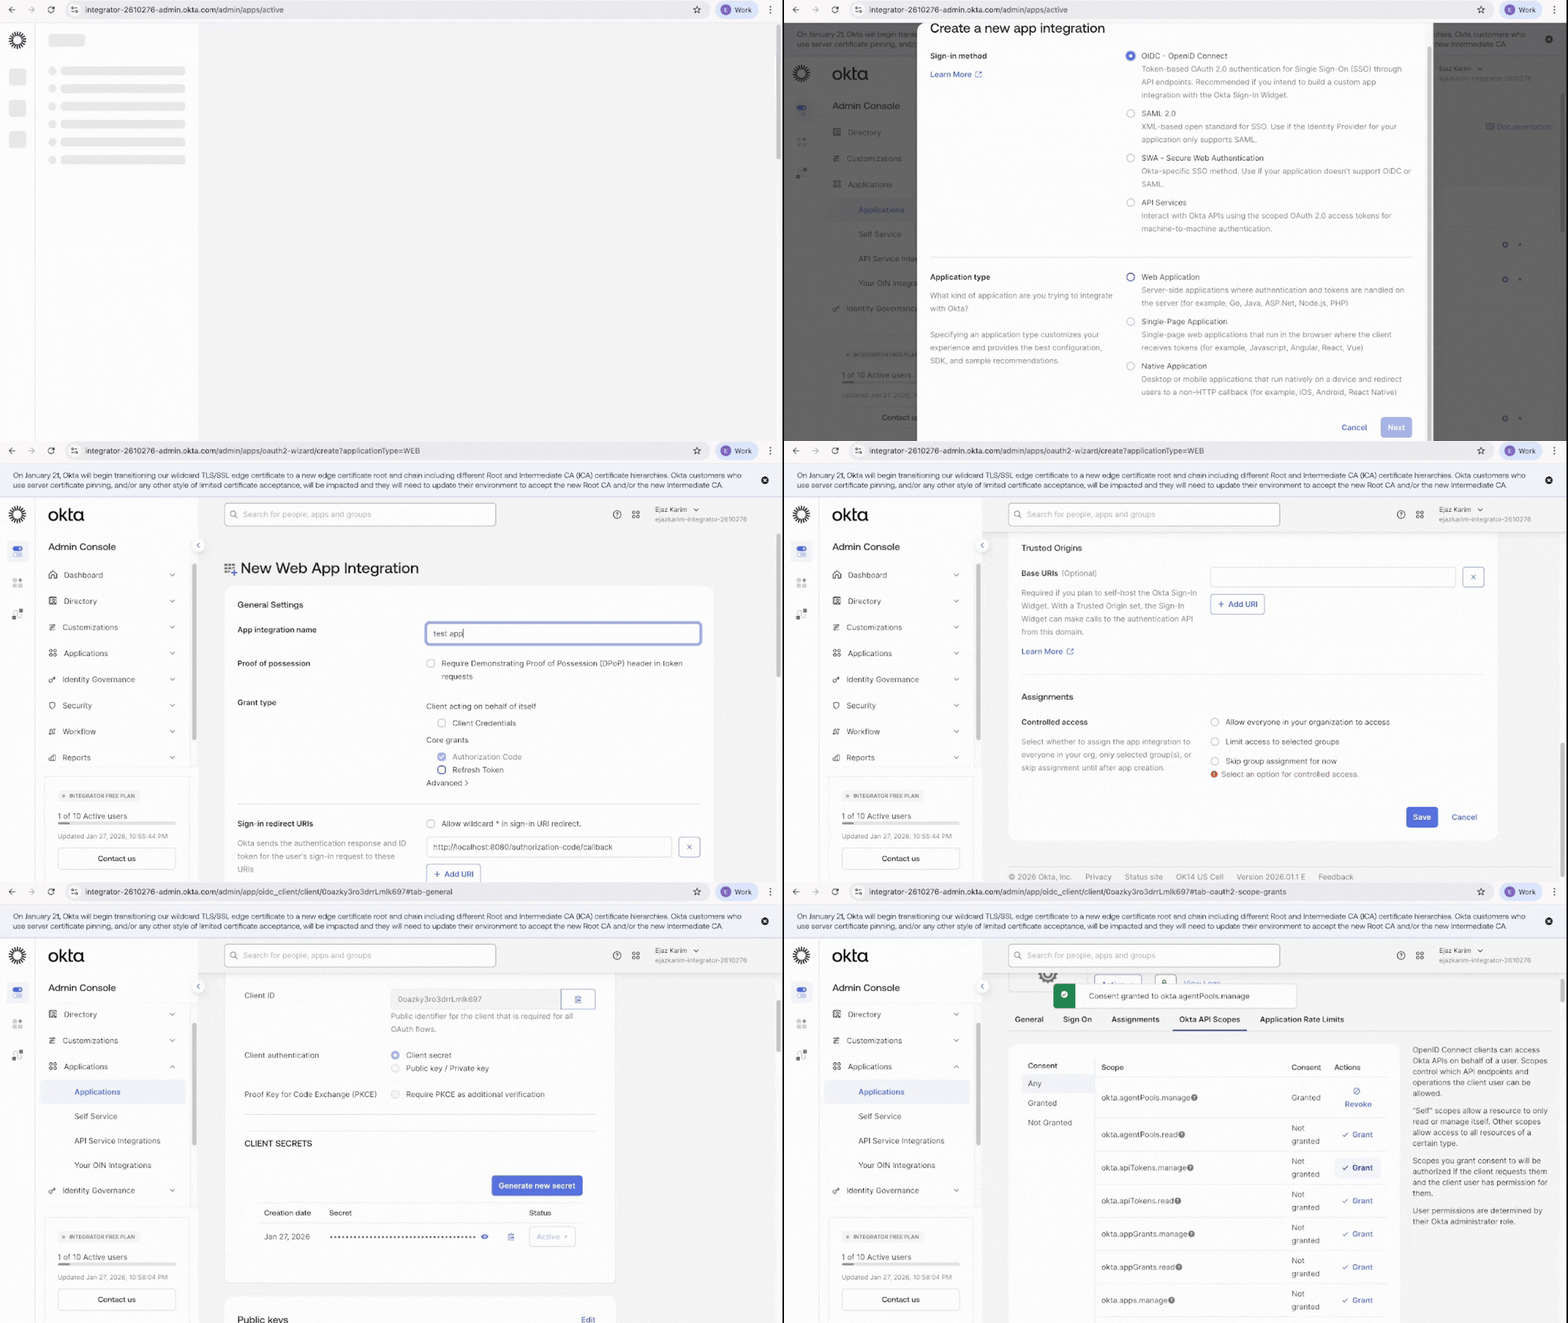
Follow the steps below to create an OAuth 2.0 app in Okta:
1. Sign in to your [Okta Admin Console](https://login.okta.com/).
2. Navigate to **Applications** > **Applications** in the left sidebar.
3. Click **Create App Integration**.
4. Select **OIDC - OpenID Connect** as the sign-in method.
5. Select **Web Application** as the application type and click **Next**.
6. Enter a descriptive **App integration name**.
7. In the **Sign-in redirect URIs** field, enter the Ampersand redirect URL: `https://api.withampersand.com/callbacks/v1/oauth`
8. Click **Save**.
The **Client ID** and **Client Secret** will be displayed in the **Client Credentials** section. Note these credentials, as you will need them to connect your app to Ampersand.
To configure scopes, navigate to the **Okta API Scopes** tab and click **Grant** next to each scope your integration requires.
 ### Add your Okta app info to Ampersand
1. Log in to your [Ampersand Dashboard](https://dashboard.withampersand.com).
2. Select the project where you want to create an Okta integration.
### Add your Okta app info to Ampersand
1. Log in to your [Ampersand Dashboard](https://dashboard.withampersand.com).
2. Select the project where you want to create an Okta integration.
 3. Select **Provider Apps**.
4. Select **Okta** from the **Provider** list.
5. Enter the **Client ID** and **Client Secret** obtained from your Okta app.
6. Enter the scopes set for your application in *Okta*. For a list of available scopes, refer to the [Okta documentation](https://developer.okta.com/docs/guides/implement-oauth-for-okta/main/#scopes-and-supported-endpoints).
3. Select **Provider Apps**.
4. Select **Okta** from the **Provider** list.
5. Enter the **Client ID** and **Client Secret** obtained from your Okta app.
6. Enter the scopes set for your application in *Okta*. For a list of available scopes, refer to the [Okta documentation](https://developer.okta.com/docs/guides/implement-oauth-for-okta/main/#scopes-and-supported-endpoints).
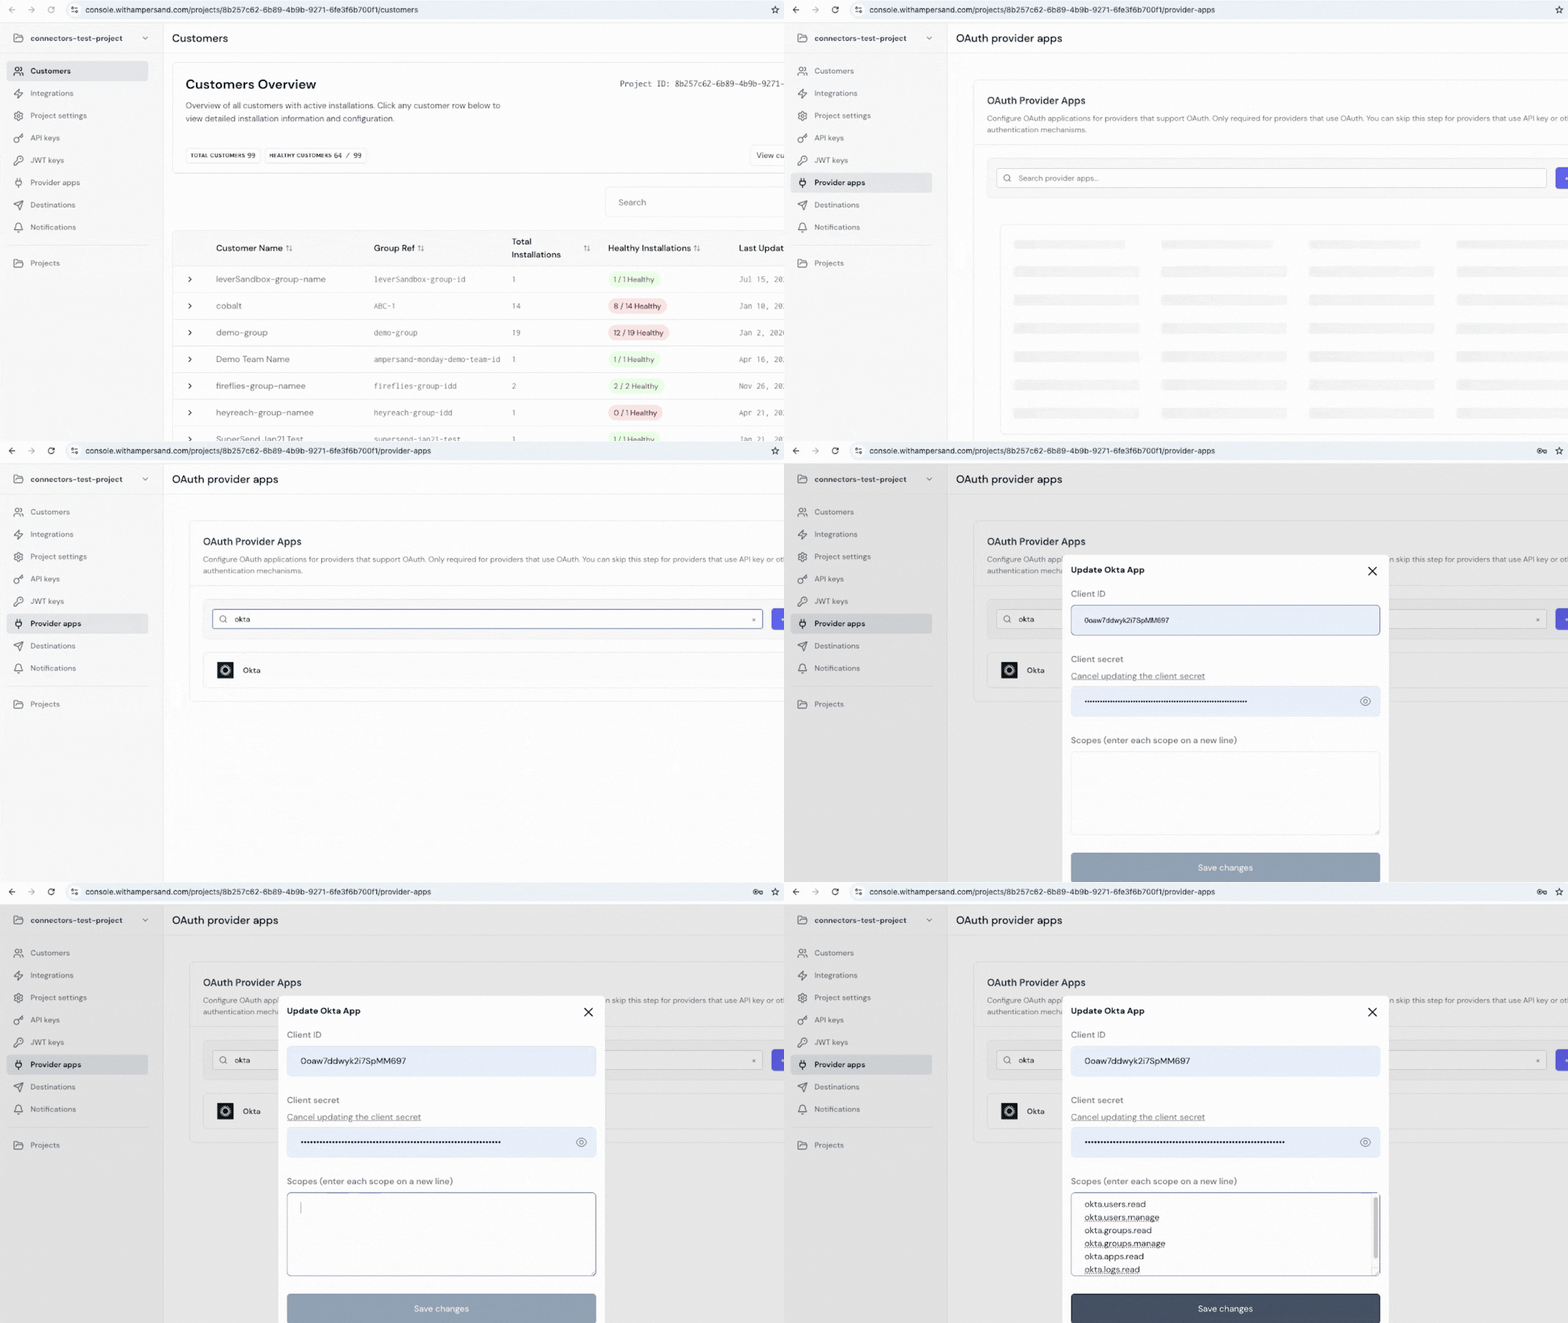 7. Click **Save Changes**.
## Using the connector
To start integrating with Okta:
* Create a manifest file like the [example above](#example-integration).
* Deploy it using the [amp CLI](/cli/overview).
* If you are using Read Actions, create a [destination](/destinations).
* Embed the [InstallIntegration](/embeddable-ui-components#install-integration) UI component. The UI component will prompt the customer for OAuth authorization.
* Start using the connector!
* If your integration has [Read Actions](/read-actions), you'll start getting webhook messages.
* If your integration has [Write Actions](/write-actions), you can start making API calls to our Write API.
* If your integration has [Proxy Actions](/proxy-actions), you can start making Proxy API calls.
This documentation is built and hosted on [Mintlify](https://mintlify.com), a developer documentation platform.
7. Click **Save Changes**.
## Using the connector
To start integrating with Okta:
* Create a manifest file like the [example above](#example-integration).
* Deploy it using the [amp CLI](/cli/overview).
* If you are using Read Actions, create a [destination](/destinations).
* Embed the [InstallIntegration](/embeddable-ui-components#install-integration) UI component. The UI component will prompt the customer for OAuth authorization.
* Start using the connector!
* If your integration has [Read Actions](/read-actions), you'll start getting webhook messages.
* If your integration has [Write Actions](/write-actions), you can start making API calls to our Write API.
* If your integration has [Proxy Actions](/proxy-actions), you can start making Proxy API calls.
This documentation is built and hosted on [Mintlify](https://mintlify.com), a developer documentation platform.